


the browser based optical simulation tool
a magyar verzi� el�rhet� itt
The Synthrays is usable again, thanks to the RUFFLE Adobe Flash emulator! Download RUFFLE extension (https://ruffle.rs/) for Chrome browser! Based on tests, compatibility is almost 100% on Windows, I experienced occasional stuttering. On Macintosh computers, the zoom function only works with physical mouse wheel, not with gesture control.
The story of SynthRays
I am an amateur photographer who is interested in optics.
Some years ago I have written an article series about the operation of digital cameras and photographic lenses.
It was full of animations, and I programmed a very simple optical simulation framework to create the frames of animated images.
A little bit later I started to modify my figures to turn them interactive, but I stopped the project.
The SynthRays is the experimental continuation of it.
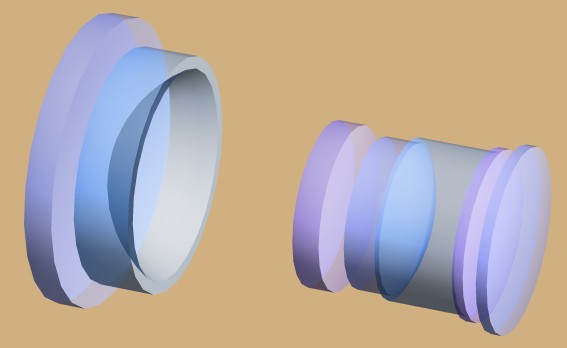
3D view of a wide angle lens with retrofocus
The SynthRays is definitely not a design tool.
The modern optical design softwares are incomparably more complex than mine.
It is an educational/hobby application. But my software does not use simplifying formulas either,
it shows the real refractions, so illustration of the most optical phenomenons are very close to reality.
My main goal with this application is give answer for some frequently asked question of photographes who also interested in optics:
- why are modern photographic lenses so complex
- how the focusing and zooming works
- what is spherical aberration and coma
- why does the aperture setting affect the image quality
- why is the image quality worse in the corners and what is the field curvature
- what is the telephoto lens design, why are the lenses shorter or longer
- what is the difference between an SLR and a rangefinder wide angle lens and what is the retrofocus design
- how converters and diopter lenses work
This version of SynthRays is a technology demonstrator, not a real release, it is made to measure the interest.
I am definietly not a qualified programmer but I roughly know a few programming languages and platforms.
I am committed to browser based applications, so I wrote the software to run in Adobe Flash plugin.
Sorry for the bugs in advance, I try to fix them as soon as possible.
The basics of optical simulation in the SynthRays
All lenses have two surfaces, and both surfaces have three data: radius of curvature, position of vertex and diameter.
The vertex is the point where optical axis crosses the surface, and its position is the most easily measurable attribute of the lens,
so it is very important in practical optics. All lenses have two vertices of course. There are two methods to define the position of vertices: absolute and relative.
By relative method you can define the space and thickness instead of Z odinate of vertices. Selecting the method is automatic.
Geometry, lenses
- the optical axis is the Z axis of the coordinate system, the positive values are on the right side
- the light is coming from the left (-Z) and going to the right (+Z)
- the lens No. 1. is the first from the left
- all position data and lengths are in millimeters
- the number of lenses is limited to fifteen (in this version)
- the minimum radius is half of the diameter and the maximum diameter is double of the radius
- the light stops outside of the surface diameter
- the recalculation between vertex, thickness and space input fields is automatic and continous
- the data in vertex, thickness and space fields are limited by vertices of nearby lenses to avoid conflicts
- the direction of cementing is right to left, so the first lens can not be cemented
- cementing of the surface copies radius and vertex from right surface of previous lens to left surface of selected lens
- cementing disables all input fields of both surfaces
- you can define plane surfaces by typing in an extremly large radius, ten million mm for example
Editing, file handling
- the caption of buttons always shows what it will do, not the current state of something
- you can drag and move the screen by the default mouse button, for zoooming use the mouse wheel
- insert buttons create a dummy lens, and make automatic renumbering of lenses
- the two memory set buttons (MS1,MS2) store the actual viewpoint and positions of cursors
- the two memory recall buttons (MR1,MR2) recall the viewpoint and stored positions
- you can select a numeric input field by clicking it and the red spot shows its selected state
- esc button on your keyboard clears the data from input field, pressing the enter realizes the change
- up and down arrows increase and decrease the data, left and right arrows do it ten times faster
- pressing the simulation button it checks the whole system, any confict disables the simulation
- the 3D mode is for viewing only (in this version), you can rotate the lens by mouse
- the Open & Add button allows to merge two systems, combination with a diopter close-up lens for example
- there must be enough free space and enough lens positions to use Open & Add function
- you have to follow the format of the files and avoid inconsistency or it will not be loaded
- the files have no default extension, you can name them as you want
- the optical system description files are editable by any text editor
Simulation
- the maximum diameter of aperture is automatically defined
- the sensor size always means its diagonal size
- behind the sensor the four small arrows show the vertical and horizontal sizes
- you can not select or deselect cemented lenses individually in simulation mode
- there are two modes of defining the position of objects: adjust angle and adjust height
- in adjust angle mode the angle of incoming rays is defined by user
- in adjust angle mode changing the object distance does not affect the angle (to study the field of view)
- in adjust height position mode the distance between the objects and Z axis is defined by user
- in adjust height position mode changing of object distance does not affect the object height (to study the magnification)
- when second object is enabled, by pressing "move" button you can select which object will be moved
- in multiray mode the focus trace marking placed onto the crossing of two outer rays from the outgoing bundle
- because everything is measured by means of displayed rays, any setting affects the focal length and magnification
- the focal length is measured by means of first object only
- the focal length is measured only when angle is zero and object distance is set to maximum
- the magnification is measured only when second object is enabled
- in simulation options you can remove the sensor and the diaphragm from optical system
I hope, any other caption of buttons, checkboxes and adjustments are trivial. I suggest that after first starting of the application, open an example file and try the different functions.
The examples
You can download some example files from here and open it by SynthRays. This package contains the following files:
- normal lens for rangefinder cameras (50mm 1:2 - 6 lenses in 3 groups)
- double-gauss normal lens for rangefinder cameras (50mm 1:2 - 6 lenses in 4 groups)
- telephoto lens (100mm 1:2.8 - 4 lenses in 4 groups)
- long telephoto lens (170mm 1:3.5 - 9 lenses in 8 groups)
- wide angle lens for rangefinder cameras (20mm 1:4 - 9 lenses in 4 groups)
- wide angle lens for rangefinder cameras (35mm 1:2.8 - 7 lenses in 4 groups)
- wide angle lens for SLR cameras (28.5mm 1:2.8 - 7 lenses in 6 groups)
- close-up lenses: 1D, 2D and 3D
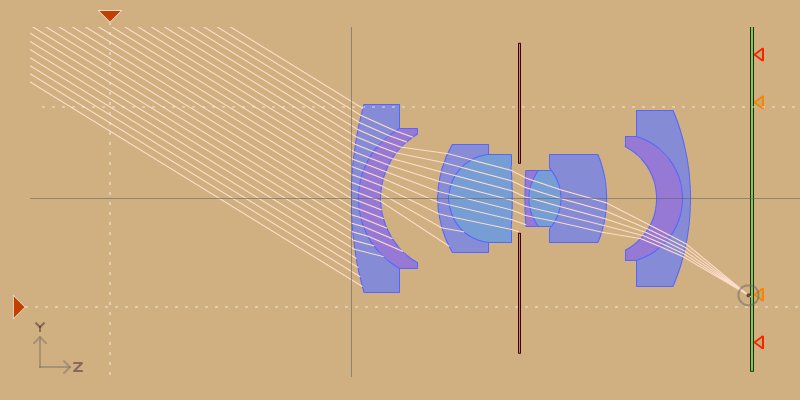
simulating a 20mm wideangle lens for rangefinder cameras
The examples are deriving from the following book:
| author: | Michael J. Kidger |
| title: |
Intermediate Optical Design |
| year: |
2004 |
| publisher: | SPIE |
| volume number: |
PM134 |
I publish the examples with permission of Tina E. Kidger and SPIE. I cannot be thankful enough for their help. Any other use of these data is not allowed without their permissions.
Planned features in future (in case of interest)
- full screen mode
- store your projects on the server
- enable mirrors to simulate catadioptric lenses and inside of SLR cameras
- improving 3D mode
- enable four objects to illustrate perspective distortion and operation of tilt-shift lenses (in relation of 3D mode improvements)
- representation of astigmatism (in relation of 3D mode improvements)
- user definied adjustments
- database of optical materials to represent chromatic aberration (only with external support)
Contact
blog
Legal notes
The online use of SynthRays is free, all other rights are reserved. Ask for my permission to use screenshots for websites, electronic or printed books.
START SYNTHRAYS
BACK TO HOMEPAGE
2011 Nagy Kriszti�n